Archive for the ‘Terrain’ Category

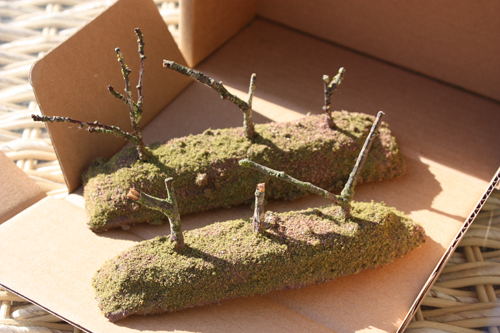
As I was building in the shed I went all out and

had a go at Teddy Bear fur fields.

Once again trusty ebay did the job and up

turned a bag of hair. After reading online I

found an old pair of clippers and lowered the height

of the fur which must start at about at least 2 inches

or more. Anyway either the clippers were blunt or who

knows what, but it was useless. Plan B came into force

and out came the trustee scissors which worked a treat.

I cut a lowered section of fur through the middle so it looked

like a natural path.

Now for the colour. The fur comes as a natural creamy/

brown which is great as grass is usually that colour

towards the bottom, away from sunlight. I borrowed the

kids hogs hair brush(big fat thing) and dry brushed

acrylic paint into the fur, trying to only paint the

top third of the fur. I basically started with a dark

green and got steadily lighter.

1st shot after 1st lot of paint:

IMG_6275b

2nd shot, more paint:

IMG_6286b

3rd shot surrounded by bocage:

IMG_6370b

I think it worked out well and once surrounded by

additional terrain such as walls and hedges it will

look even better.

Deep in the depths of my shed I have been experimenting

with the bocage and have finally got a winner, perhaps ?

Step One:

Polystyrene was used for the banking(light and dirt cheap)

and cut to shape, then pva glued. I based one on 3mm mdf

and didn’t bother with the other. The cocktail sticks

are just to hold it together while gluing.

IMG_6250a

Step Two:

Add some twigs from the garden as tree trunks and glue

into place.

IMG_6252a

Step Three:

I used standard house hold filler to smooth off the bank

and any sharp edges. I then cover everything in pva glue

and added a mix of sand and stone for texture. Let dry.

IMG_6257a

Step Four:

Paint brown with house hold paint.

IMG_6260a

Step Five:

More pva glue over all and add your flock/scatter mix.

I tried all green at 1st but found the brown gave it a

better look.

IMG_6263a

Step Six:

Grab your self some rubberised horse hair(ebay was cheap)

and separate it out into thin bits. It comes as a thick

section and reminds me of horse jumping hedges. Now with

your pva glue again thread between your twig trees and glue

down. I found you had to put weights on the horse hair while

gluing as it springs up otherwise. I added a bit of moss as

well.

IMG_6270a

Step Seven:

Using a spray bottle(50/50 pva glue and water) spray the

horse hair with your glue mix. Now sprinkle on your scatter

so it looks like leaves. Leave it dry over night.

IMG_6287a

This is what it looks like next to a field and with a tank in:

Click on the image to get a bigger version 🙂

IMG_6354a

I tried two other methods of making bocage from moss but

was not happy with the outcome.

Also the bocage next to field is not 100% finished and

needs a bit of airbrushing here and there.

What do you think ?

Decided to make my Jagdpanther blend in a bit more

with a bit of camo. Take a few bits of electrical wire

and twist them together to make the branches. Next paint

them brown(couple of coats will be needed) and they stick on

your flock with pva glue. I painted lighter colours(yellows and

browns) onto the flock before sticking it on. I then got me a bit

of cheese cloth and dipped it in a mixer of Agrax wash and green

paint and then dried it in the conservatory for a camo net. Now

just stick your camo net onto your vehicle and thread through the

branches.

Click on picture for bigger size.

IMG_6185a

I have left this camo net hang loose but you can apply it slightly

damp and mold it to the vehicle shape.

Just finished by Battlefront plastic Jagdpanther and I`m very

pleased with it. The cheaper plastic kit(there is a metal version) is

just as good and comes with a ruined building(not shown). Once again I

really could not be bothered getting the airbrush out for a couple of

minutes use and then spending an hour cleaning it so free hand time

with the camouflage.

Please click on pictures for larger size.

IMG_6173a

IMG_6172a

IMG_6173a

IMG_6174a

IMG_6175a

IMG_6176a

IMG_6179a

IMG_6180a

The interesting part about this small project for me was the bocage

itself. I knew what bocage was and have been all over Normandy and seen

the stuff first hand. What was compelling was the constant argument on

various forums about should bocage have stone at the bottom of it ? Well

the first hand and most accurate answer is yes and no. Some bocage is built

up on age old(Middle ages or later) walls and some is not. Quite often stone is

used on hill sections of bocage and deep cuttings. Farmers in general clear fields

and push stone to the side and leave it. It is then overgrown by weeds and becomes

part of the bank/hedge.

The second compelling bit of information I came across after reading up on the

subject was the way enemy tanks were killed in the bocage. First initial thought

was great big dirty tank destroyer behind a hedge kills all(the Jagdpanther for example),

but you couldn’t be more wrong.

In bocage country 54% of tank kills were caused by gunfire(tank,anti tank,td and arty),

20% by mines,13% by non combat(stuck in mud or mechanical failure),7% by Panzerfaust

and the remaining 6% by miscellaneous.

If we then look at the 54% in more detail ,Britsh and American studies show that half

of theses kills were attributed to Stugs and by direct frontal penetration at an

average 800 yards. Forget the Jagdpanthers,Panzer I`Vs,PAK 43 man handled and arty the Stug

was the main man in the bocage!

Anyway I`m building a Normandy board as we speak to look out for hand crafted bocage with

and without stones and a few lurking Stugs.

Ork Work and lots of it

Posted: February 26, 2014 in 40k, Orks, Scratch Built, Terrain
Tags: ,

I have been attending to my Orks as of late and
everything in this post is newly finished.

My Orks needed a base of sorts so out came the
bits box, plasticard and some filler. I blatantly
borrowed an idea of using a CD case holder as a
starting point from http://www.ifelix.co.uk. I then
added a walkway to another ground based fort.

IMG_5917

IMG_5911

IMG_5912

IMG_5910

IMG_5908

IMG_5902

I added some fun detail with a dead Blood Angel
minus his arms and a foot tied up in wire to
the outside as a sort of Ork welcome mat.

IMG_5880

A few Ork glyphs made from plasticard

were stuck on.

IMG_5882

IMG_5884

An access hatch was added for the Gretchin.

IMG_5885

A nice bloody access point was also added at

ground level.

IMG_5889

I also painted up some more Orks and Gretchin

and made a free standing Ork Glyph to warn off

anybody in the near by area.

IMG_5895

IMG_5914

Oh and one last thing I added a Kromlech

cannon nicely covered in rust and slightly

kit bashed.

IMG_5905

IMG_5906

IMG_5907

Also forgot to mention that the walkway/bridge

comes straight off so it makes storage nice

and easy.

More object markers and scenery for 15mm

wargaming.

fuel2

Fuel1

Both by Battlefront.

Battle Board

Posted: June 22, 2013 in 40k, Terrain
Tags:

Recently got round to painting a Realm Of Battle Board section. I`ve gone for the sci-fi ,red Mars look.

IMG_4328

The board was sanded first,then marked with a craft knife to allow paint to adhere to it.

It was then primed with Chaos black(spray can).

Next a  coat of local diy store brown paint with sharp sand mixed in.This gives it the rocky look.

Additional larger rocks were stuck on with super glue and then painted over.

Next a couple of dry brush coats to highlight everything.

The red streaks  are Mig Pigments Old Rust P230.

The pigment must be sealed over with Mig sealant or the colour will fade after adding varnish.

Finally a coat of matt varnish to seal the board.