
Click on any picture to enlarge
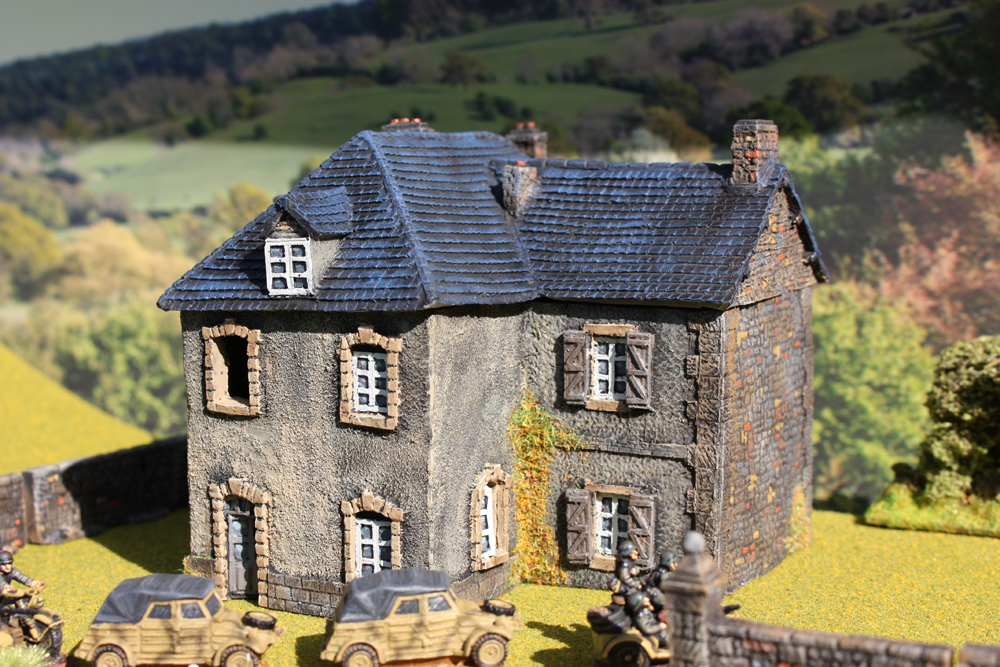
Translated it roughly means farmhouse or some
where the farmer would live. I`m sure some French expert
will correct me lol.
Another Noveu Loic bit of terrain all painted up with
a slight Autumnal feel to it.

Enjoy:)
Click on any picture to enlarge
Translated it roughly means farmhouse or some
where the farmer would live. I`m sure some French expert
will correct me lol.
Another Noveu Loic bit of terrain all painted up with
a slight Autumnal feel to it.
Enjoy:)

Click on an image to enlarge
Another Noveu Loic building and one more building
complete, phew.
Apart from the church(still under construction) this
is the biggest building so far and after painting it all
up I get the impression it just needs a Swastika hanging
from a pole outside and its an instant SS headquarters ?
Perhaps a staff car parked on a gravel drive would be
the finishing touch ?
Straightforward to paint and I added a basic wooden
floor to the inside. Excellent quality building as per
usual and well worth the money.


As promised I am posting up my ever growing list
of finished buildings that now grace my wargaming board.
Eventually I should have enough to build a village or
small town.
First up a farm building from Neveu Loic.
Click on an image to enlarge


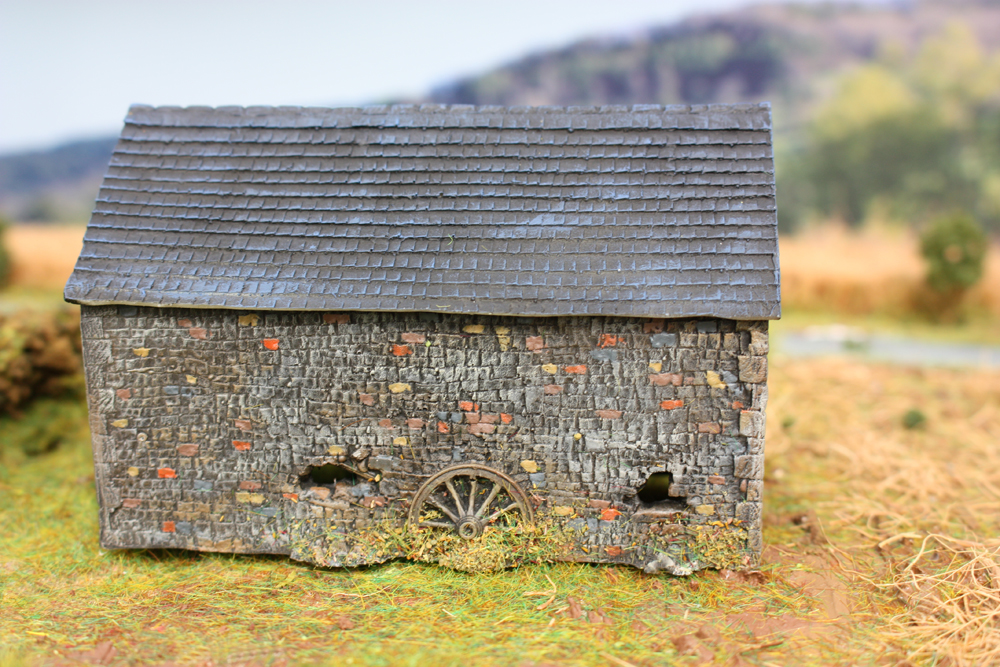
Second a cow shed from Hovels ,”Papelotte” range.

And lastly the “Great barn” also from Hovels.


That’s it for now but lots more coming shortly. I have
actually finished my Normandy church but you will have
to wait for me to finish its surroundings before you
get to see it. It will be worth the wait.
.
Click on any picture to enlarge
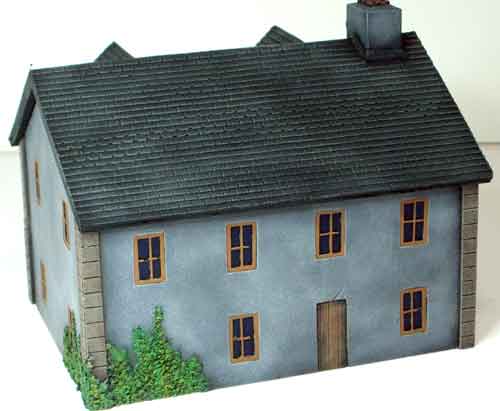
I have already mentioned Tiger Terrain in the 15mm WW2 Terrain review, but
I wanted to go in greater detail and show you what beautiful
buildings they produce and what can be done with them.
The building under the microscope is the ,”damaged farmhouse”
which will set you back £15.30. It comes unpainted and in 4
parts. You can also buy the farmhouse undamaged.
The parts consist of the base with walls of the building, two chimney stacks
and a floor that nicely slots in. There are also some tiny parts
like shutters and windows which allow you to customise the
farmhouse to your choice(a nice little touch).
The resin moulds required no fine sanding and I was unable
to find any flash which was a pleasant surprise. All the parts
fitted together smoothly and I was able to get painting straight
away. Due to the high amount of detail on these models its really
easy to get an excellent finished product and it particularly suited
my method of painting Normandy buildings.
I added a few tiny extra bits of detail to please myself but overall
a fantastic bit of scenery which I think other manufacturers will
find hard to beat.
As you can see there is also loads of room to hide your men inside.


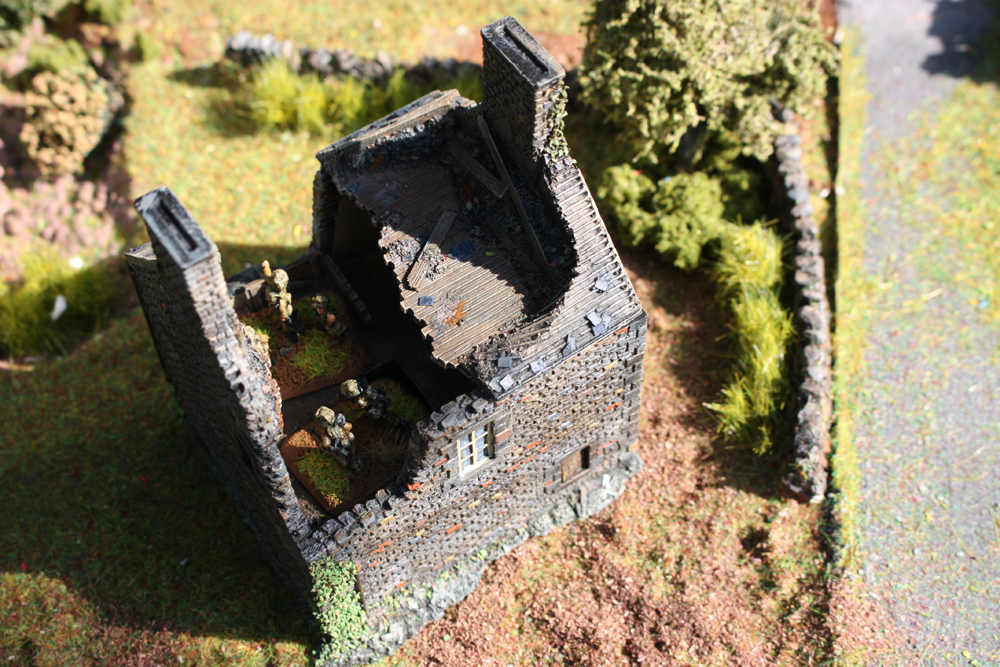

Give yourself a pat on the back Tiger Terrain.
15mm WW2 Wargaming Terrain Review
I have been building a lot of terrain as of late and decided to
write a review of what’s available on the market ,specifically
if your wargaming anything to do with Normandy but its still
relevant for most other WW2 wargaming at the 15mm size, particularly
Western Europe.
My review is based on many things including, how detailed the terrain is,
how large the terrain range is, how easy the terrain is to construct, the
uniqueness of the terrain and how customer friendly the company are.
The first 7 reviews are of terrain manufacturers that I have bought,
modified, played and lived with. They are rated after the review out
of a total of 5 points.
Following that are a list of other terrain makers I have yet to
experience but deserve a mention. They are not rated.

Najewitz has a 15mm range that covers Normandy, Italy and Historic. The
Italian range is not available yet but apparently available soon and the Historic
range is limited. Saying that, it’s the Normandy range that is the real jewel in the
crown. There is a Pegasus bridge(for all those who want to play with Horsa gliders),
a fantastic walled farmstead and various sets of houses to make up your Normandy
town or village. The resin buildings come as kits and are unpainted but are
extremely well made and high in detail. An example price would be 45 euros for the
farmstead(which includes a house, a barn, a hay loft, a small shed and a complete surrounding
wall and mini gatehouse for the farm). This sounds pricey but your getting some seriously
good kit. So far I have only found one other manufacturer
of 15mm terrain that produces buildings of this high quality.
Rating : 4.5 out of 5.
2. Loic Neveu.

Yes it’s a French website, but hold your horses. Do not be put off by the French language
and look past the words and have a good look at all that beautiful terrain. Loic Neveu
is an ex French paratrooper who runs the site which is called Decors. All you have to do is send
him and e-mail for a quote and he will work out the costs and get back to you in English, easy !
Onto the models themselves. The 15mm terrain range is huge and is probably the biggest out there
that I know of, strangely not many people are aware of this. WW2 terrain covered includes Normandy,
France ,Germany ,North Africa and Russia.
The quality of the terrain is fantastic and comes with huge amount of detail. Its all unpainted but there
is a great selection from a tiny sandbag gun pit up to the gigantic Normandy church. There is even a range
of civilian cars. One thing I really like is the ability to buy nearly everything in the range as either perfect
or battle damaged.
Rating : 4.9 out of 5.
3. Flames Of War /Battlefront/
Everybody has a piece from the Battlefield In a Box range and to be honest the stuff is quite good. It
comes fully painted and is instantly ready for battle. Its reasonably priced and looks good on the table.
Now the down sides. As mentioned everybody has a piece, so your terrain is not going to stand out
and will look like all those tournament games at your local wargaming show(couple of buildings thrown
on a green bit of felt with a strange floating road). The range is also quite limited and I found difficulty
in getting hold of various bits of stock.
Rating: 3.8 out of 5.
Keer and King have a large range of terrain including French, Dutch, North African,Russian,
and Oriental. Included in this range is a large amount of fortifications and bases. The simple
French building pictured above will cost you £16 plus postage. I have one gripe with the product
and that is its feels and looks a bit block like to me. It is also not as highly detailed as the Goldfinger
and Najewitz terrain.
Rating: 4.1 out of 5.
5. Hovels.

Hovels seem to have been around of ages and I think of them as the back bone of model terrain.
If you need a bit of terrain and cannot find it else where,Hovels will have it. Hovels have a huge
15mm range but only a small section is dedicated to WW2. One thing to point out though is that a large
amount of the 15mm ranges carry across to WW2 and will easily sit on a WW2 battle board. A drinking well
from the Napoleonic range or the great barn(see picture above) are timeless and will simply fit in,
which is a great credit to Hovels. Hovels terrain is very well priced and you can buy the
product ready painted if you choose. The Great Barn pictured above will cost you £13 unpainted.
Rating: 4.3 out of 5.

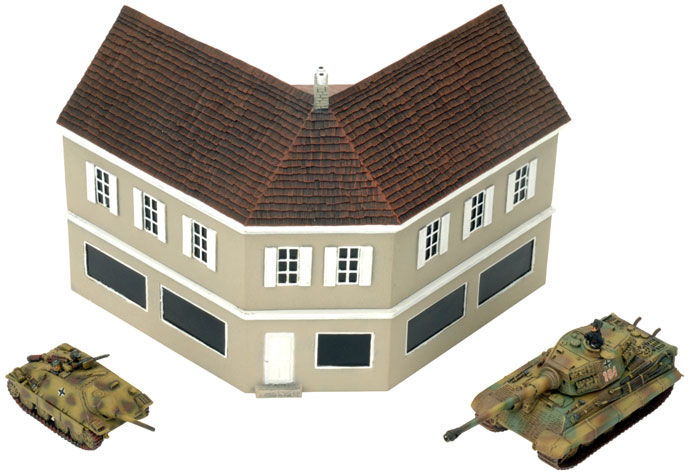
Tiger Terrain as of yet only have a small selection(just covering Normandy) of stuff
but its high quality and the range is growing. I particularly like the Norman church and
the outhouse toilets are excellent. The walled gardens are also a great idea. All models
come unpainted and are resin. The house above on the left would cost you £9 without
the walled garden.
Rating: 4.4 out of 5.
7. Timecast

When the Normandy and Northern France models first came out I thought they were
a bit of a revelation. For me they were the first guys to build terrain specifically aimed
at wargaming Normandy in 15mm. If you want ready made buildings that are painted
then this is most likely the way to go. Now the draw backs. The terrain only comes
ready painted and for me that’s a pain as I like to personalise kit. It also to my eyes and
standing next to other WW2 15mm terrain looks slightly smallish in scale. One other tiny
fault is that I have found that over time the windows(which are stuck on inserts) drop
out. £17.40 will buy the church above.
Rating: 4.2 out of 5.
And now for the rest which are not rated just links and a brief description.
So far as I am aware the only 15mm terrain Crescent Root make is Middle eastern style.
Its made from textured coated MDF and from the pictures it looks stunning.
Lets hope they get into 15mm Normandy terrain shortly as their terrain in 20mm and 28mm
is also fantastic looking.
Gamecraft miniatures specialise in MDF kits. They do a town and country range,
a foam board range(with lots of Middle East stuff), European town and villages
resins kits and modular tile and road systems.
10. The Miniature Building Authority.
They cover a 15mm European range which comes in pre-painted resin.
Specialises in 15mm terrain that would suit any period. There is no WW2 specific section.
12. JR Minis.
Small range of 15mm WW2 terrain.
13. Gelaendestuecke.
Beautifully hand painted WW2 scenery from Germany.
The 15mm range covers Eastern Europe, Western Europe and the Middle East.
On top that they do some very nice road systems suitable for 15mm as well. You can choose
painted or unpainted.
15. Paper Terrain.
Exactly what it says on the tin, terrain made from paper. The main advantage is cost,
you get a lot for building for your money.
Only a small range and its nearly all fortifications.
17. Warbases.
15mm MDF covering WW2.
Its resin and comes painted or unpainted.
19. Epsilon.
Ready to play terrain all painted just for you.
——————————————————————————————
Hope you enjoyed my basic review and please note that I am
aware that not everybody was included. If you would like some
other terrain makers added then just please ask. I am happy to
review anything if its WW2 related and especially Normandy
themed. If any information is incorrect or out of date please
contact me and I will attempt to rectify it.
Please note : The views and ratings stated above are solely my own
and may not reflect the views of the manufacturers.

If you search the net for walls in 15mm,20mm,28mm etc you will find
literally hundreds of companies that make them and in a huge amount of
varieties. Even so there is a conspiracy out there that thow shalt not make
or sell a curved wall. A do not mean a tiny curved wall but a long sweeping
20 degree curve of a wall. If you look at any pictures of WW2 gaming every
house has a straight wall connected to it, every factory has a square
compound so a straight wall can encompass it.
Even the narrow and winding lanes of the ancient bocage countryside that
were shaped by wandering sheep and carts supposedly wandered in straight
lines to ensure straight walls.
Noooooooooooooo, it cannot be true.
Up until now due to the inability of designers to mould in a curve and a quiet
majority of complacent wargamers who have ignored this strange conspiracy,
we have lived in straight walled world.
That was until (drum roll) the company called http://www.modelscenery.com/ invented Reddiprene38.

Basically a hard type of rubber that can be cut with a sharp knife easily
and then shaped using a hairdryer for less than 20 secs into any shape you desire.
It stays in the shape you mould it into. There is no mess and you have lots of time
to mould it and fix it into the desired position.
The church wall in the picture below was moulded by me and each 200mm section of
wall took me about 30 seconds to shape into place. Its stayed that shape ever since !
Whats more that entire length of wall surrounding the church cost £3.40 and is
suitable for 15mm up to 30mm depending on how you cut it.

Its so good I would give this product my vote for best product made for the
modelling community this year, perhaps this decade ?
So now you need never be driven around the bend by straight walls and forever
spiral in control(not out).
Normandy Tiger

Normandy Tiger
I have not painted up any German armour for a long while
so on finding a Battlefront Tiger 1 E early still in my
large box of things I have never got round to painting it was game on.
Now the initial impetus came from finally watching the film, “Fury” and
no need to go into the failings of that film. Linked to a recent trip to
Bovington Tank Museum and a new burst of activity on my Normandy terrain
boards it was full steam ahead. Those of you who know your Battlefront
kits will immediately realise I had a problem because the Tiger has rubber
road wheels, no spare tracks and most importantly no zimmerit on it. All
these things are kind of vital for a Normandy Tiger. My first issue was solved
by a few rubber wheeled Tigers still serving in Normandy specifically I went for
tank number 131 belonging to Ustuf Walter Hahn of the Schwer Abteilung 101 .
Next problem was the Zimmerit, so time to experiment with fine household filler
and a sharp knife. In the end is was rather tricky but worked.

The model was airbrushed using Vallejo colours and it took me quite a few coats
to get the effect and colour I wanted. Unfortunately I`m no expert with an airbrush
and I`m sure a lot of people would have completed the job a lot quicker than me.
The spare tank tracks attached to the turret are PSC extras and so is part of the
stowage. The helmets are spare from somewhere ?

Next up being Normandy and the sky being full of Allied planes just itching to bomb
something friendly or not ,some serious camouflage was called for. I have found it
really difficult to get camouflage correct on tanks as 9 times out of ten it just looks
crap. So in my best effort yet I went for the car filter scheme, which has been broken
up into tiny bits and sprayed green and brown . Scatter was then added for effect.
Decals were a problem as I was unable to find any tank numbers in 15mm that are
green with a white outline(colour of the SS 101). I partially solved the issue by
attaching clear decals with white outlines. The green of the tank comes through
the decal, its not perfect but way easier than attempting free hand.


Hope you like it and the scenic backdrops ?

I have recently been doing a lot of reading
up on Zimmerit and the mystery surrounding its
limited time span of use.
Zimmerit was a non-magnetic coating produced for German AFV`s
during WW II for the purpose of combating magnetically attached
anti-tank mines. It was developed by the German company Chemische
Werke Zimmer AG and used from 1943-1944. It was basically a cement
type coating which provided small gaps and uneven ridges on the
outside of the tanks stopping magnetic mines being attached.
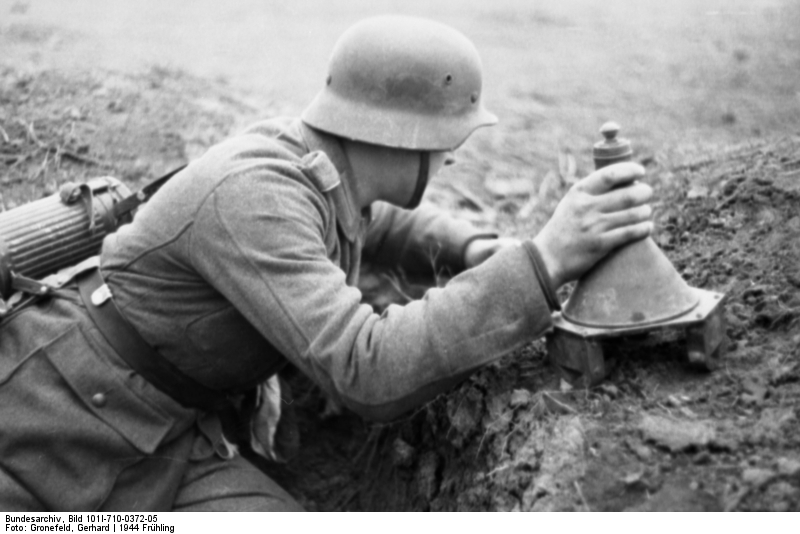
Strangely the Germans came up with the idea after inventing a
magnetic mine of their own(the Hafthohlladung 3 Mine) specially
to be used against tanks.
The picture below shows a Hafthohlladung courtesy of the
Bunderarchive.
Unfortunately the Germans believed because
they had created such a mine the allies would surely follow and thus
the invention of zimmerit. In a strange irony the allies never did use
magnetic tank mines.
Zimmerit was applied to tanks as far as I`m aware at the factory and
not in the field. The following description of how zimmerit is applied
is taken from various factual sources including the Haynes Tiger Tank manual,
Military Classic Vehicles, the Bovington archive and the Mike Gibb stug
restoration project.
Zimmerit was made from zinc sulphide, barium sulphate,pine saw dust,
PVA,peeble dust,ochre and pine crystals. The process involves dissolving
the pine crystals in a large quantity of benzene(which is highly flammable and I will come back
to this at a later stage). This creates a sticky golden liquid which
when added to the other ingredients helps the PVA adhere and harden.
Next you are required to trowl on the material to the AFV applying
ridges in a set pattern(they are a number of different patterns). Firstly
a 2mm layer is applied and then from 5cm away a blow lamp is
used to harden and burn off excess moisture. This results in
significant fires. 4 hours or more later a second 4mm layer is
added in the same way. As an example a Stug would require 100kg
of zimmerit to cover it correctly.
Once dry(at least 72hrs) the surface can be painted.
Below is a picture of the zimmerit found on Tiger II.

This is zimmerit on a Stug III

The German high command decided in 1944 to stop applying zimmerit
to AFV`s for various reasons. The obvious being it was not needed
as the allies did not use magnetic tank mines , plus is was costly
and time consuming. A further,discarded reason was that
there were reports coming back from the front that zimmerit was
flammable ?
This is the point that interested me in the subject to start
with and has been frowned apon by the military forums for years
and to me it seemed strange. If reports are coming back from front
line units that zimmerit is flammable and is burning up tanks why
disregard the theory point blank,which is what people have been
doing right up until Mike Gibb put people in the picture.
The key to the issue is the benzene and temperature. The application
of zimmerit as described above only works if its warm. If its cold a
number of issues occur. Cold weather stops the benzene from hardening
properly(this cannot be seen by the naked eye or by touch). This un-
hardened surface is then painted over and the paint locks into the benzene
which has not evaporated. The result is a AFV being sent out into combat
just waiting for a round to ignite the benzene!
Now add to the boiling pot that most of the reports are coming back from
the Eastern Front in 43-44 of zimmerit fires where the temperature is hitting
minus 40 in the winter. Plus Germany is losing the war so the need to rush
tanks out of the factory faster and faster creates a time bomb waiting to
ignite, literally.
A number of nations tested the flammable zimmerit theory after the war
and were unable to get it to burn but they were unaware of the application
problem in cold weather and most likely used a correctly applied zimmerit
vehicle that had seen action. We will never know ?
One other thing about zimmerit that was not intended but was a pleasant
surprise noticed by German and Allied tank commanders alike was its
camouflage characteristics . It naturally created an anti-shine to any
tank that had it and broke up the outline of the tank.
Below is a link to the Weald Foundation and Wheatcroft Collection that
restore AFV`s and collected and tested the info on the zimmerit :
http://www.thetankchannel.com/sdkfzstugiii.html
http://www.wheatcroftcollection.com/
Hope you liked the brief explanation on zimmerit and please get
in touch if you know of any extra information. Its always good
to learn a little more. I would be especially interested in
any information on field application of the stuff as there are
a few suggestions on the net about it but no solid proof as yet.

I decided to take the wife for a day out at the sea side
yesterday and it just so happened that the route
went right past a tank a museum so I had to have
a look. Yes your correct she didn’t believe that for
a second but it was worth a try.
Back to the subject in hand and what a fantastic tank
museum Bovington is. Its in deep dark Dorset and about 15mins
from the South coast so it was near the sea lol.
Now I have only posted up a select few pictures to give
you a taster but I must of taken 300 plus photos easy. Its
the boring photos that are the most important and interesting
to me the modeller. Tiny little things like different types of zimmerit and
the way it is applied ,how air intakes are aligned, the way wheels overlap
between tracks and tiny details that are left off 15mm models that I can add
myself.
Just looking at weld seams is interesting to somebody that
loves detail. You also you need to stand next to some tanks
to get a feel for the size and power of the thing(the Jagdtiger
would be a great example of a beast of a machine).
If you ever think of going its better than all the write ups.
Probably the best tank and AFV collection in the world plus they
have a fully working Tiger tank. Plus its only £13 to get it and
gives you a free entry for a year.
Other plus points are that they have an open day once a year called
“Tankfest” where the tanks are let out and strut their stuff and the
local wargaming club holds its wargaming events between the tanks.
Click on any picture to enlarge it.


Sorry the pictures are all WW2, there are all periods
of tank covered at the museum.
One small word of warning, there
is a huge shop and its impossible not to buy something.
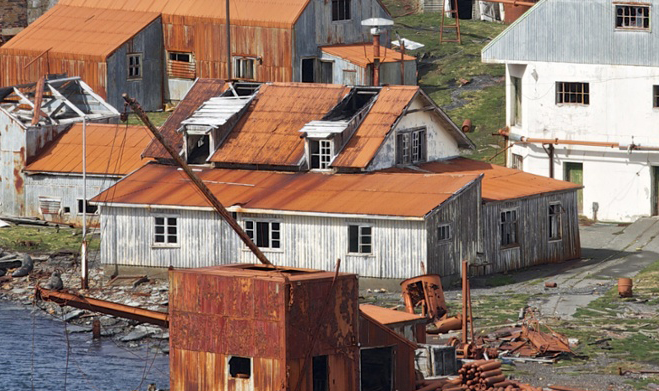
For my Infinity project I have been trying to get
the feel and atmosphere to a certain whaling station
called Leith in the South Atlantic. I have micro zoomed
in on a still standing building called the, ” The Managers
house” in an attempt to carry across some of the feel of the
place. Now its not exact(I am no expert scratch builder by a long
way) and I have used artistic licence but I hope its in the style
of Leith and what I trying to bring out in the terrain ?
The 1st picture below is the original picture of the “Managers
House”. All the pictures can be enlarged by clicking on them .


It not yet totally finished and I have just placed it on
a bit of empty terrain to check its suitability. Eventually it
will be surrounded by scrap metal. Also all the roof sections
are easily removed so the interior is playable.
One thing I have learnt is that I take my hat off to scratch
builders as the amount of patience needed to build these things
is nearly beyond me lol.
Enjoy .
Blog about Bretonnia
About fine scenery for modeling
Escaping back to fantasy
A Miniature Painting Blog
musings of a fat old bloke on tanks and wargames
Miniatures & Terrains
A Miniature Wargaming Blog
The Devenish brothers wargaming blog
WW2 Modelling in 1/72 Scale
Queegs home for modelling and painting projects, wargaming and whimsy
Strategy, wargaming and militaria. Mostly.
Wargaming
Battles of WW2 in 15mm & Beyond
A Finnish miniature & modelling blog
Collecting Yu Jing for Infinity.
A miniature hobby blog focusing on WHFB and WH40K
Miniature painting, wargaming terrain tutorials, reviews, interviews and painting guides
