Posts Tagged ‘Flames Of War’

IMG_8950a

I have recently been doing a lot of reading

up on Zimmerit and the mystery surrounding its

limited time span of use.

Zimmerit was a non-magnetic coating produced for German AFV`s

during WW II for the purpose of combating magnetically attached

anti-tank mines. It was developed by the German company Chemische

Werke Zimmer AG and used from 1943-1944. It was basically a cement

type coating which provided small gaps and uneven ridges on the

outside of the tanks stopping magnetic mines being attached.

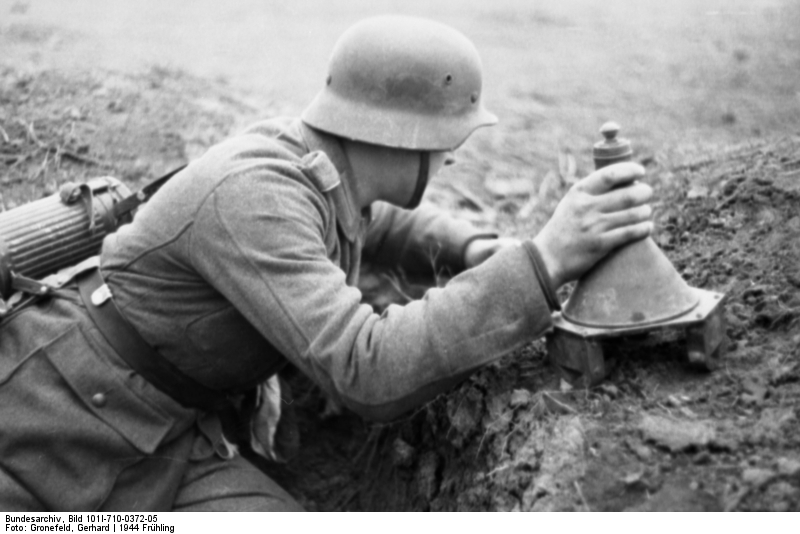
Strangely the Germans came up with the idea after inventing a

magnetic mine of their own(the Hafthohlladung 3 Mine) specially

to be used against tanks.

The picture below shows a Hafthohlladung courtesy of the

Bunderarchive.

bild-110

Unfortunately the Germans believed because

they had created such a mine the allies would surely follow and thus

the invention of zimmerit. In a strange irony the allies never did use

magnetic tank mines.

Zimmerit was applied to tanks as far as I`m aware at the factory and

not in the field. The following description of how zimmerit is applied

is taken from various factual sources including the Haynes Tiger Tank manual,

Military Classic Vehicles, the Bovington archive and the Mike Gibb stug

restoration project.

Zimmerit was made from zinc sulphide, barium sulphate,pine saw dust,

PVA,peeble dust,ochre and pine crystals. The process involves dissolving

the pine crystals in a large quantity of benzene(which is highly flammable and I will come back

to this at a later stage). This creates a sticky golden liquid which

when added to the other ingredients helps the PVA adhere and harden.

Next you are required to trowl on the material to the AFV applying

ridges in a set pattern(they are a number of different patterns). Firstly

a 2mm layer is applied and then from 5cm away a blow lamp is

used to harden and burn off excess moisture. This results in

significant fires. 4 hours or more later a second 4mm layer is

added in the same way. As an example a Stug would require 100kg

of zimmerit to cover it correctly.

Once dry(at least 72hrs) the surface can be painted.

Below is a picture of the zimmerit found on Tiger II.

IMG_8971a

This is zimmerit on a Stug III

IMG_8969a

The German high command decided in 1944 to stop applying zimmerit

to AFV`s for various reasons. The obvious being it was not needed

as the allies did not use magnetic tank mines , plus is was costly

and time consuming. A further,discarded reason was that

there were reports coming back from the front that zimmerit was

flammable ?

This is the point that interested me in the subject to start

with and has been frowned apon by the military forums for years

and to me it seemed strange. If reports are coming back from front

line units that zimmerit is flammable and is burning up tanks why

disregard the theory point blank,which is what people have been

doing right up until Mike Gibb put people in the picture.

The key to the issue is the benzene and temperature. The application

of zimmerit as described above only works if its warm. If its cold a

number of issues occur. Cold weather stops the benzene from hardening

properly(this cannot be seen by the naked eye or by touch). This un-

hardened surface is then painted over and the paint locks into the benzene

which has not evaporated. The result is a AFV being sent out into combat

just waiting for a round to ignite the benzene!

Now add to the boiling pot that most of the reports are coming back from

the Eastern Front in 43-44 of zimmerit fires where the temperature is hitting

minus 40 in the winter. Plus Germany is losing the war so the need to rush

tanks out of the factory faster and faster creates a time bomb waiting to

ignite, literally.

A number of nations tested the flammable zimmerit theory after the war

and were unable to get it to burn but they were unaware of the application

problem in cold weather and most likely used a correctly applied zimmerit

vehicle that had seen action. We will never know ?

One other thing about zimmerit that was not intended but was a pleasant

surprise noticed by German and Allied tank commanders alike was its

camouflage characteristics . It naturally created an anti-shine to any

tank that had it and broke up the outline of the tank.

Below is a link to the Weald Foundation and Wheatcroft Collection that

restore AFV`s and collected and tested the info on the zimmerit :

http://www.thetankchannel.com/sdkfzstugiii.html

http://www.wheatcroftcollection.com/

Hope you liked the brief explanation on zimmerit and please get

in touch if you know of any extra information. Its always good

to learn a little more. I would be especially interested in

any information on field application of the stuff as there are

a few suggestions on the net about it but no solid proof as yet.

Untitleda-1

I have wanted to make a Berge Panzer for some

time and decided on a Panzer III. Why a Panzer III,

well I had a spare FOW Panzer III that never got

built for Early War so it was ideal. Most 15mm

manufacturers already make a Bergepanzer but I

wanted to scratch build one myself.

Its was actually a straight forward build. All I

had to do was build a plasticard box to sit on the chassis

and a winch frame of some sort. I added a few spare

vehicle bits which any decent vehicle recovery unit

would have. I also used a bit of model ship chain, a

model ship pulley and ship rope for the winching gear. The

three crew are from various places.

Please note if you click on a picture it will enlarge.

IMG_8872a

IMG_8875a

IMG_8876a

IMG_8877a

IMG_8882a

Hope you like it ?

Untitled-1aaaaa

I have been playing around with backdrops for a

while now and I decided to take the plunge and

create one myself. So off I went with my trusty

SLR camera and found some French-ish looking

countryside(to be honest a hedge in England looks

just like a hedge in France) and snapped away.

I then paid a princely sum of £10 and got the

picture put onto Matte card.

The pictures below are the result. Beware they are

quite big photos and if you click on an image it

will enlarge.

Untitled-1aaa

Untitled-1aaaa

Untitled-1aa

IMG_8809a

IMG_8796a

IMG_8791a

IMG_8811a

So how did I get on. To be critical the trees in lower

section are too large and I should of stood back

a bit when taking the photo. The Matte finish seemed

good and I was pleased with the size(300 x900).

Overall it looks fantastic, especially when its behind

your models. I have been to a couple of wargaming shows

this year and as of yet I have seen nothing as good as this

backdrop wise, if anything at all. If you go to a model

railway show they use them to great effect but it seems

wargamers are missing a trick.

Anyway hope you liked them and perhaps it will inspire

a few more people to have a go.

IMG_8519a
I`m done until I build some more boards and yes

I hear you all groaning… not more boards !!!!

No my next project will be some Infinity boards so

rest easy.

Anyway back to the Normandy boards. I have added and finished

two new boards to make a total of six for the playing

area(4 x 6). The latest two have a nice river obstacle with

hump back bridge. They also contain a fixed defensive trench

line and artillery battery area. The artillery battery area and trench

line are camouflaged to stop the allied Typhoons rocketing the

hell out of place.

Please note you can click on all pictures to enlarge

and some of the pictures are quite big.

IMG_8524a

I have added a full Panzer Lehr Division and the British 11th

Armoured Division to the board so you can see how it all feels

to play with.

Arty preparing to fire.

IMG_8529a

Target spotted.

IMG_8530a

View from above.

IMG_8532a

Look out the boss is watching.

IMG_8535a

Life in the trenches.

IMG_8537a

Ok whos walked mud into the trench ?

IMG_8538a

British forces prepare to enter the bocage.

IMG_8555a

Panthers trying to deploy in bocage.

IMG_8564a

Panzer Grenadiers moving up to join the action.

IMG_8570a

German infantry moving up.

IMG_8573a

Panthers stuck in a sunken lane.

IMG_8584a

MKIV in ambush position.

IMG_8594a

Moaning minnies at home in the thick hedgerows.

IMG_8595a

Halftrack traffic jam plus a bit of anti air.

IMG_8598a

Anybody bring any hedge cutters ?

IMG_8604a

Hold on, hump back bridge.

IMG_8606a

Lost Panzer IV.

Untitleda-1

JagderPanzer IV`s defending the left flank.

Untitledb-1

Thankfully the sun came out and allowed me to take the

photos above.

I will post up a battle report soon to see how bocage fighting

pans out 🙂

Typhoon2

Just click on an image to enlarge :

Its a Revel Micro Wings Hawker Typhoon 1B

which comes as an unpainted 1:144 scale kit at

tiny cost of £2.99. The reason I went for this kit

is simply the price. The equivalent plane from

Battlefront is £11.50 plus P & P so I`m onto a winner

straight away.

Now apart from a few plane kits when I was about 10 yrs

old this was all new to me. For a start the kit is

absolutely tiny so unless you have the fingers of a church

mouse your going to have problems. Some of the parts are so

small I needed tweezers to hold them. On top of the that the

kit is not the best quality in the world but for £2.99 I`m

not moaning. I followed the Flames of War rough paint guide

which used Vallejo colours and did all the stripes by free

hand which you probably guessed by the not so straight lines.

Overall I produced a basic table top paint job. Three things that

bugged me about this kit were the rockets under the wings which

were just bad quality model kit, the cockpit which fails to have

enough model detail and the decals. The decals were intended to

go over a non D-Day black and white striped plane so don’t look

correct.

Typhoon1

IMG_8483a

The photo below is the same as the black and white photo and

without the stand being edited out.

IMG_8447a

Finally I think a taller stand is needed ?

Anyway I`m off to straff some unprepared German armour 🙂

Eventually I want a board for town warfare and

this is the first house for the street. Its another

excellent kit by Najewitz Modellbau. Its comes under

the name of ” Dead mans corner” and I have modified it a bit

by removing the outside stairs and inserting floors inside

for soldiers to stand on. The roof is removable as usual.

All kits come unpainted and you have to fit it all

together yourself but its not hard.

Click on the picture to enlarge

IMG_8432a

I think I might add some creeping ivy to the outside of it

eventually ? The colour by the way is an exact match to a

French house I saw recently in Auch. Not Normandy but still

a popular town house colour in France.

test-1

Click on the picky to enlarge.

Sometimes you just have too many things on the go

and I have reached overload, arrrrrrrrhhhhhhhhh.

On the work table as I type:

1. Laser cut 28mm radar built but not painted.
2. 3 Infinty Fusiliers about to be glued.
3. Saito Togan 28mm Infinity built but not painted.
4. 15mm Bergepanzer III, scratch built & half painted by airbrush.
5. 15mm Opel Blitz truck built but not painted.
6. SDkfz 251 built but not painted.
7. Hawker Typhoon 15mm built and 85% painted.
8. 2 large Normandy terrain boards 50% completed & painted.
9. 2 mini diorama boards just started(28mm).
10. 1 mini diorama board just started(15mm).
11. Large Normandy town house 75% completed and painted.
12. 3 Order Sgts Infinity 28mm 80% complete.
13. 5 ornate Scibor minatures bases attempting to paint to
a professional standard(95% complete).
14. 3 Chaos dogs 28mm 90% complete with no master as yet.
15. Large Infinity terrain boards times 6(metre square each) at the
drawing and planning stage.
16. 40k Ultramarine dreadnought.

On top of this like everybody else I have a large box of future

projects as well. Which future that will be is anybody’s guess lol

So I`m going to have a painting\building fest and put a huge dent

in my backlog. February was a lean month by my standards and my

blog as been a bit quiet, but fear not avid readers.

March is going to be crazy, hang on in there as I break the 100

posts mark.

I know, I know I`m still doing the Normandy board

thing lol. Its been on hold for a while but my

creative juice has returned and its back to the

grind stone. I have been working on a small river/

stream and its taken some time to get it right. I hate

the lovely blue rivers you get on most wargaming boards

and wanted something a bit more disgusting looking to be

exact. Thus I need multiple coats of varnish over lots of

greens and browns because that’s the colour of the nearest

stream to me.

Click on a picky to enlarge:

IMG_8375a

IMG_8395a

IMG_8397a

Now I have got the basis of the river in place I can

start to work on the bocage around it. I hope to cover

a lot of the river with overgrown stuff so it really looks

like a silted up, stagnant , slow running river.

Loads more work to do on the trench section and gun battery pits

but that will be a lot easier to do than the river.

If you have some British recon in WW2 and your

fighting in Normandy and beyond you just have to have

a SOD(Sawn Off Daimler). Why, because it looks like something

from a Mad Max road movie and that’s super cool.

In an effort to keep up with fast moving columns and a lack

of small agile vehicles the British removed the turrets off

Daimler armoured cars and came up with this crazy vehicle. Often

used as a command vehicle this thing was all about speed and wind

in your hair. Basically find a panzer and then drive like hell.

Sod-1

Sod-2

Sod_3

Sod_4

Mine has a PIAT weapon(more for morale than anything else)

and some additional aerials.

I have been wanting to do a tutorial on painting

for ages and I finally remembered to take photos of

my work as I went along. This tutorial is aimed at

getting a basic to good standard on a 15mm Sherman or

any allied vehicle without using an airbrush. I use

a combination of Vallejo and GW paints.

Step 1: I assembled more or less entire the tank.Some

people leave the tracks off for painting.

Click on any picture in the tutorial to enlarge.

Tut_4

I sprayed the

entire tank with Chaos Black primer. Leave for 24hrs.

Tut_5

Step 2: Using a brush touch up any areas that the spray

can missed with Chaos Black GW paint. Just brush it on.

Step 3 : With a flat brush gently brush on Vallejo 924

Russian uniform over the whole tank. Please note at this

stage its not going to look great but bare with it. Also ensure

you brush strokes are in one direction down the length of the tank.

Tut_6

Tut_7

Step 4: Another coat of Vallejo 924 exactly the same

as before. It should now start to look better.

Step 5: Finally another coat of 924 and the colour should

be perfect.

Tut_8

Step 6: GW Agrax wash(basically a black wash). Gently put

it in all the small gaps and places shadow will sit. Do

not wash it all over the tank ! Don’t forget to do the tracks and

areas in-between and behind.

Tut_9

Tut_10

Step 7: Drybrush 886 Vallejo Green Grey using a flat brush

over all the raised parts. This will give you a good

highlight against the 924.

Tut_12

Step 8:
Decals time. Carefully cut out to size and put on

your decals. I put mine on with Micro Set and leave them to

dry over night.

Tut_13

Tut_15

Step 9:
Next up is the tracks. Some people as mentioned add

the tracks later making it easier to get your paint brush into

the area under the mud guards. Its up to you but I find it

possible with a small brush. Paint the tracks black.

Tut_16

Step 10 : First I use a HB pencil to literally

draw on the tracks leaving a silver shiny track look. Don’t go mad.

Tut_17

Step 11: Vallejo 818 Red leather dry brushed(small amount) onto the

tracks.

Tut_18

Step 12 : I then stuck on the wooden stowage and painted it Vallejo

Flat Brown. You can paint the tool handles at the same time. Later

highlight with GW Tallarn sand or Vallejo New Wood.

Tut_19

Step 13 : Tool heads and clasps are painted GW Leadbelcher and later

highlighted with GW Chainmail. Finally add an agrax wash.

Tut_20

Tut_21

Step 14: Optional weathering. Light dry brush of Flat earth on tracks

and lower running gear and bottom areas of the tank.

Tut_22

Step 15: Optional adding crew. The commander was added and I used GW

green stuff to back fill the large gap in the commander’s cupola and help

stick the twin opening hatches on. The commander was painted with English Uniform

followed by an agrax wash. I used GW Tallarn sand for highlights.

Tut_23

Tut_24

Step 16 : Testors Dullcote varnish spray to make sure your paintwork is

protected.

………………………………………………………..
I hope this tutorial was helpful and will make it easier for some

people to get started in the hobby without having to become master

painters. The picture below is what the finished product looks like

with a nice backdrop behind it and in the correct lighting conditions.

I think my tutorial pictures had a bit too much light in them giving

the tank an incorrect shiny look.

Tut_30

Happy painting .