Archive for the ‘15mm’ Category

I have been wanting to do a tutorial on painting

for ages and I finally remembered to take photos of

my work as I went along. This tutorial is aimed at

getting a basic to good standard on a 15mm Sherman or

any allied vehicle without using an airbrush. I use

a combination of Vallejo and GW paints.

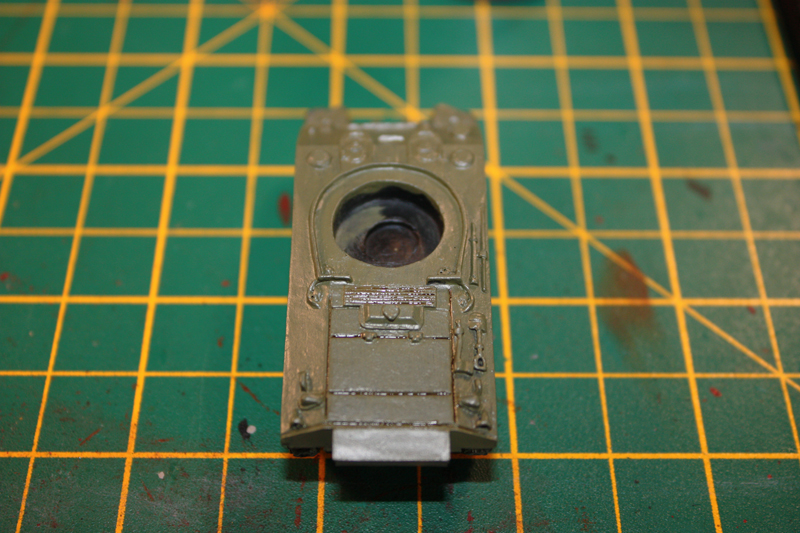
Step 1: I assembled more or less entire the tank.Some

people leave the tracks off for painting.

Click on any picture in the tutorial to enlarge.
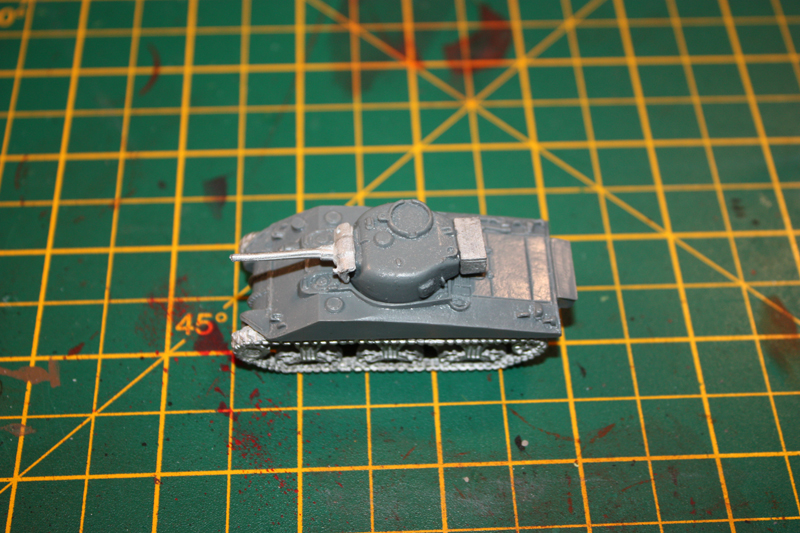
Tut_4

I sprayed the

entire tank with Chaos Black primer. Leave for 24hrs.

Tut_5

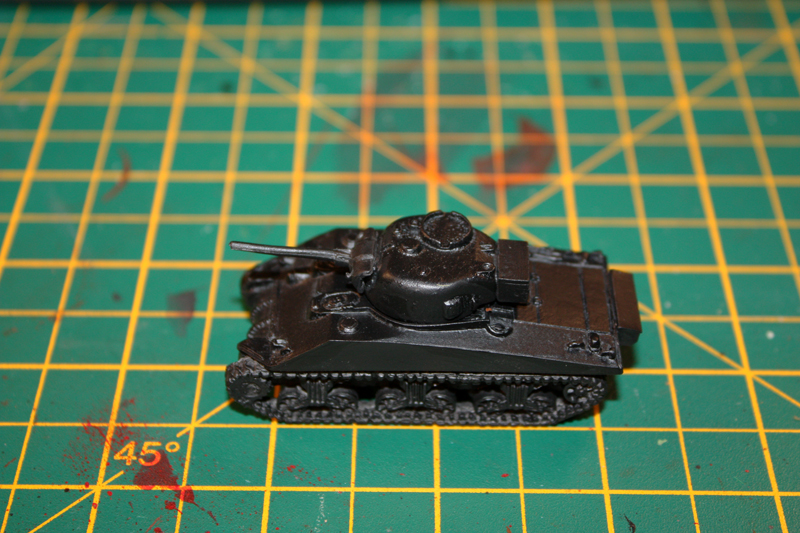
Step 2: Using a brush touch up any areas that the spray

can missed with Chaos Black GW paint. Just brush it on.

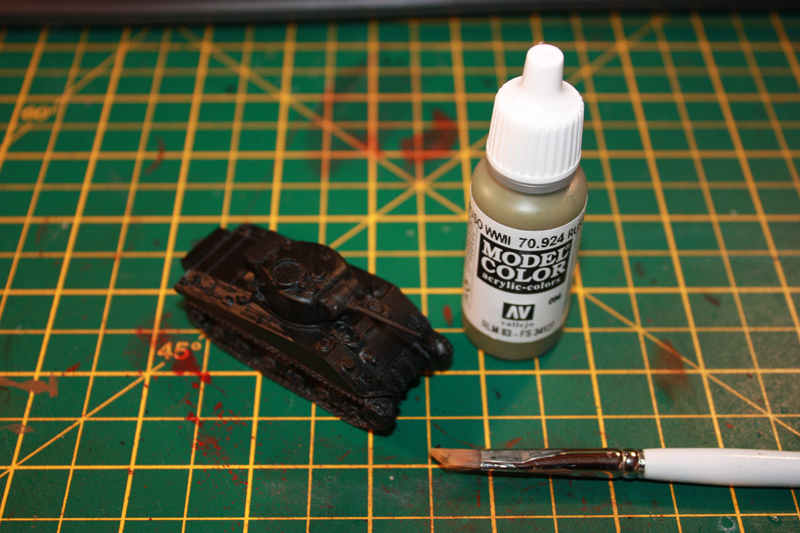
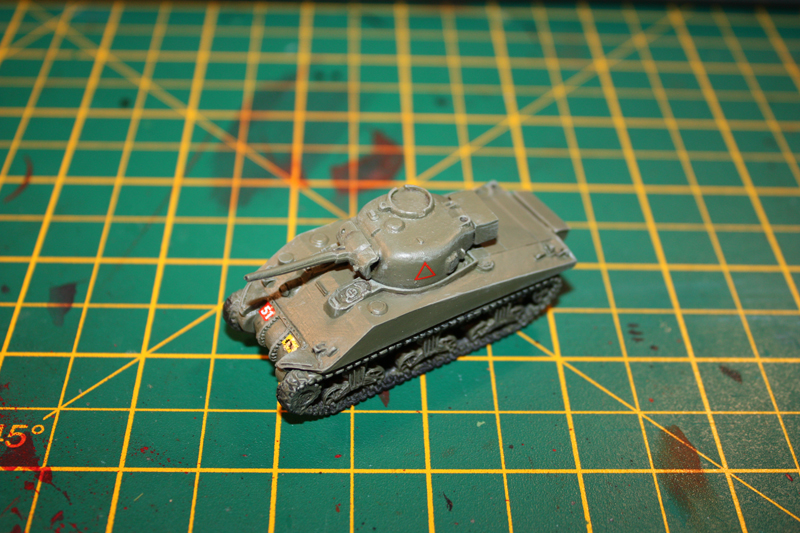
Step 3 : With a flat brush gently brush on Vallejo 924

Russian uniform over the whole tank. Please note at this

stage its not going to look great but bare with it. Also ensure

you brush strokes are in one direction down the length of the tank.

Tut_6

Tut_7

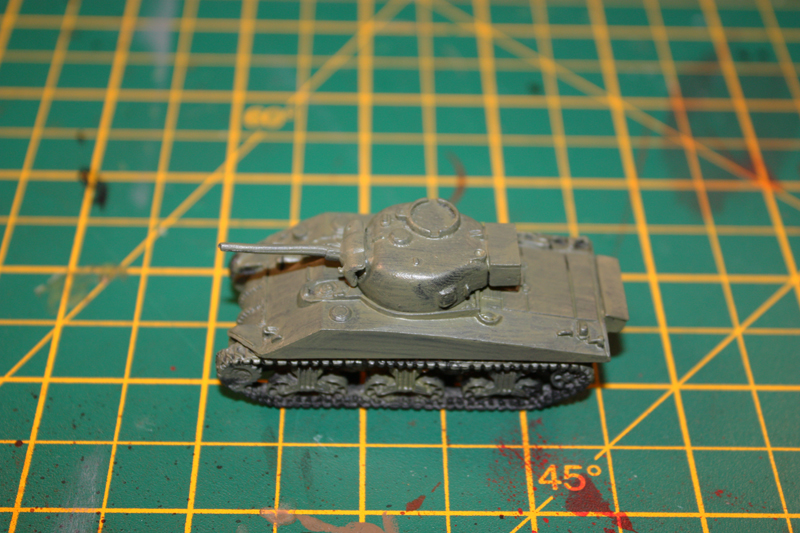
Step 4: Another coat of Vallejo 924 exactly the same

as before. It should now start to look better.

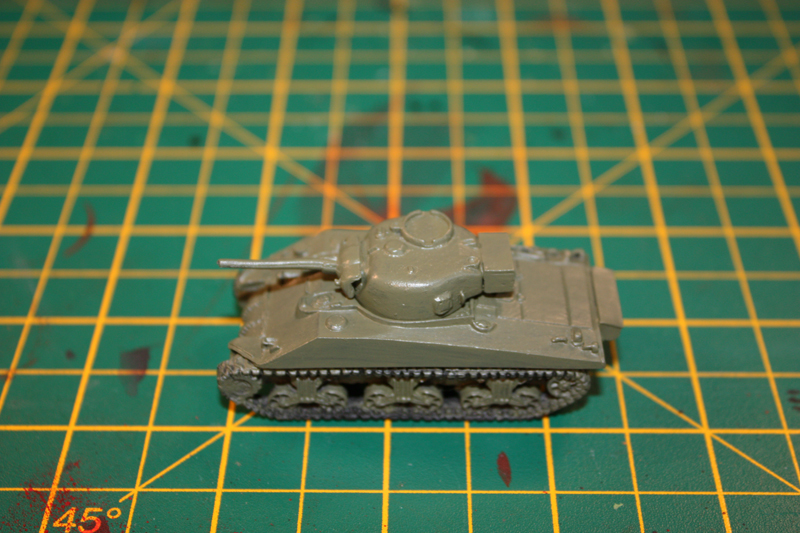
Step 5: Finally another coat of 924 and the colour should

be perfect.

Tut_8

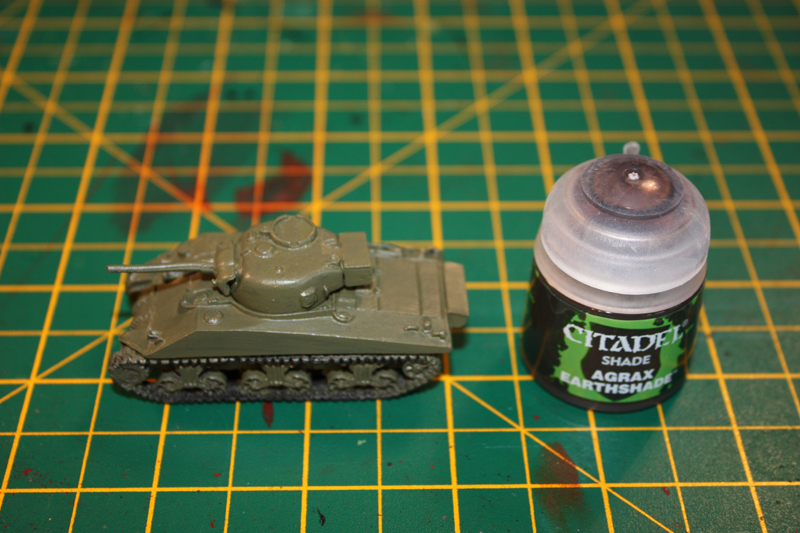
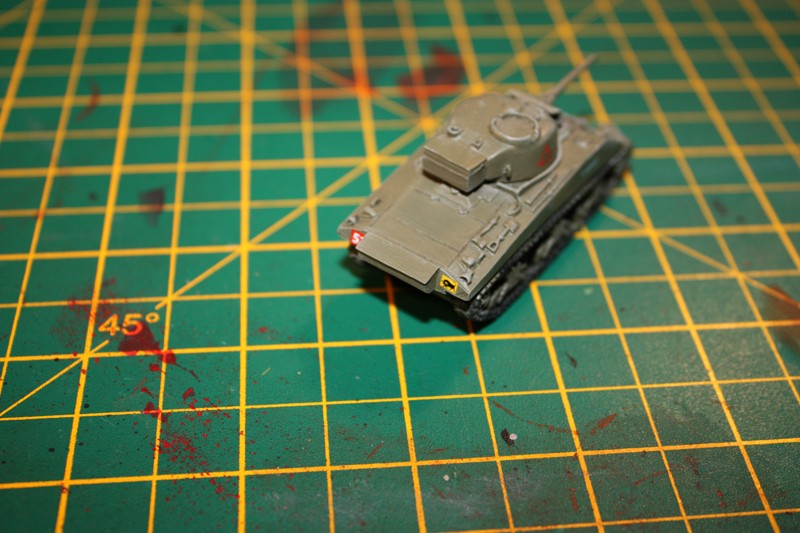
Step 6: GW Agrax wash(basically a black wash). Gently put

it in all the small gaps and places shadow will sit. Do

not wash it all over the tank ! Don’t forget to do the tracks and

areas in-between and behind.

Tut_9

Tut_10

Step 7: Drybrush 886 Vallejo Green Grey using a flat brush

over all the raised parts. This will give you a good

highlight against the 924.

Tut_12

Step 8:
Decals time. Carefully cut out to size and put on

your decals. I put mine on with Micro Set and leave them to

dry over night.

Tut_13

Tut_15

Step 9:
Next up is the tracks. Some people as mentioned add

the tracks later making it easier to get your paint brush into

the area under the mud guards. Its up to you but I find it

possible with a small brush. Paint the tracks black.

Tut_16

Step 10 : First I use a HB pencil to literally

draw on the tracks leaving a silver shiny track look. Don’t go mad.

Tut_17

Step 11: Vallejo 818 Red leather dry brushed(small amount) onto the

tracks.

Tut_18

Step 12 : I then stuck on the wooden stowage and painted it Vallejo

Flat Brown. You can paint the tool handles at the same time. Later

highlight with GW Tallarn sand or Vallejo New Wood.

Tut_19

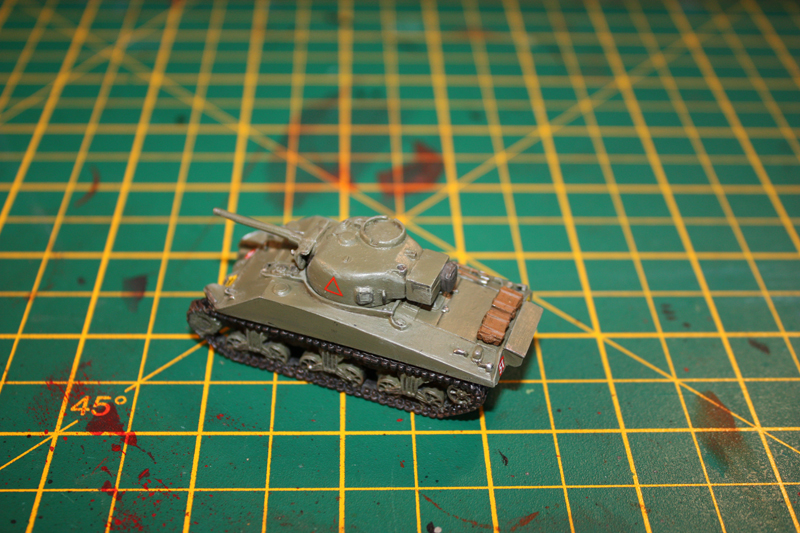
Step 13 : Tool heads and clasps are painted GW Leadbelcher and later

highlighted with GW Chainmail. Finally add an agrax wash.

Tut_20

Tut_21

Step 14: Optional weathering. Light dry brush of Flat earth on tracks

and lower running gear and bottom areas of the tank.

Tut_22

Step 15: Optional adding crew. The commander was added and I used GW

green stuff to back fill the large gap in the commander’s cupola and help

stick the twin opening hatches on. The commander was painted with English Uniform

followed by an agrax wash. I used GW Tallarn sand for highlights.

Tut_23

Tut_24

Step 16 : Testors Dullcote varnish spray to make sure your paintwork is

protected.

………………………………………………………..
I hope this tutorial was helpful and will make it easier for some

people to get started in the hobby without having to become master

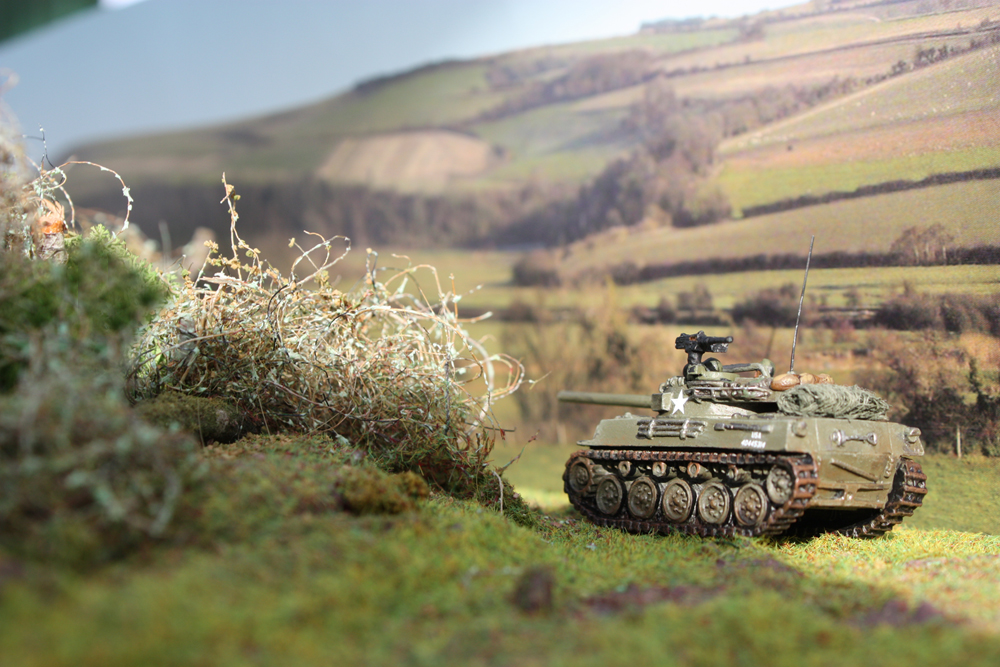
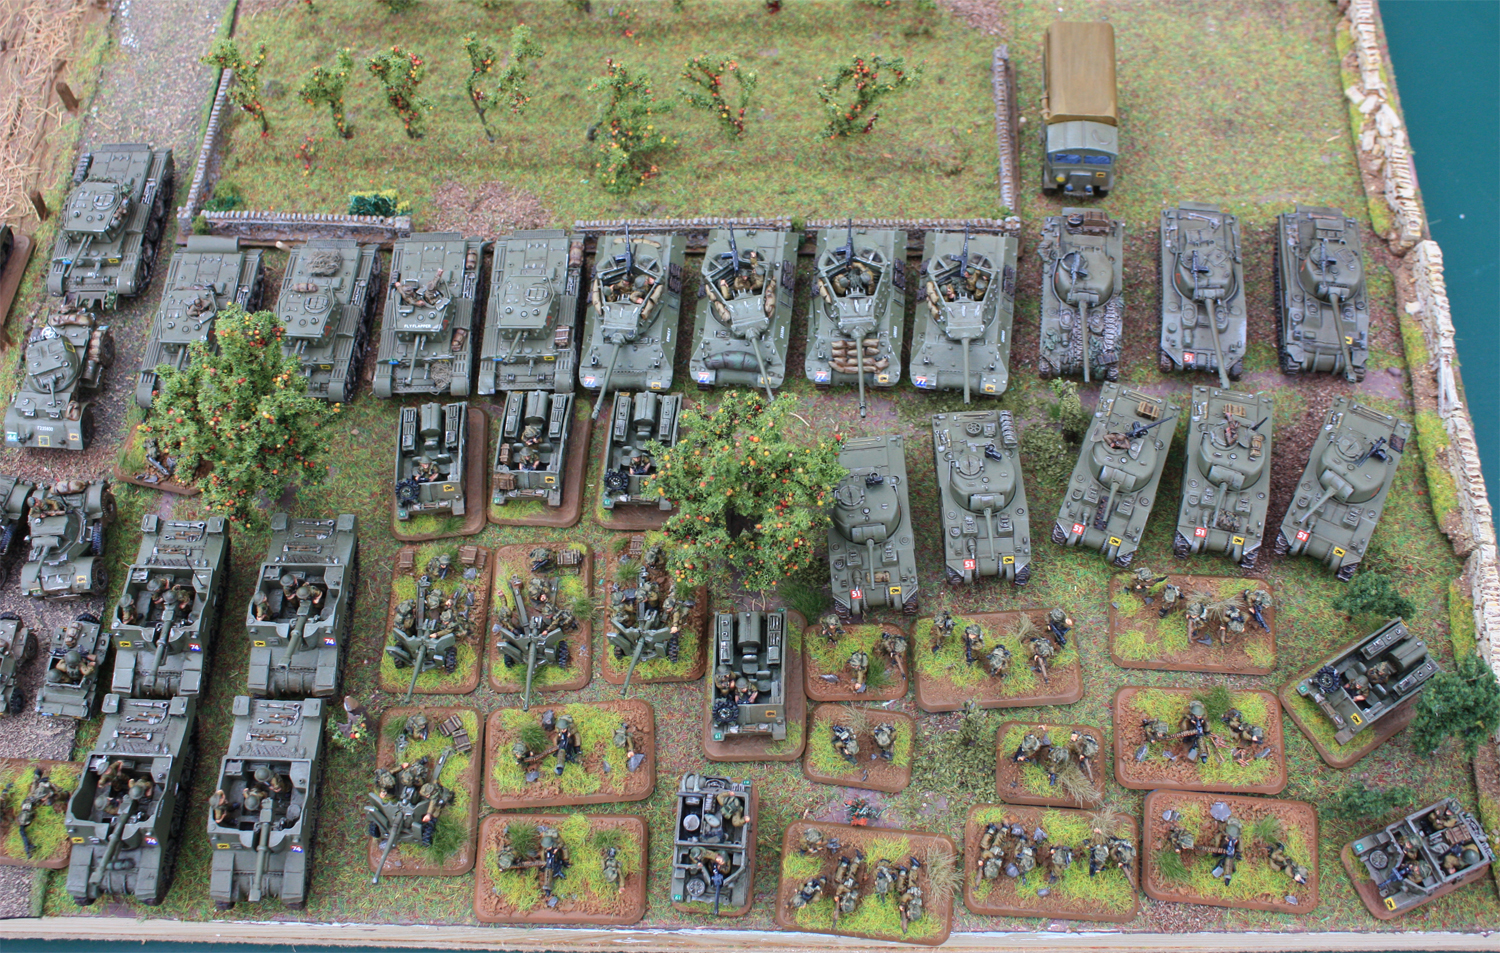
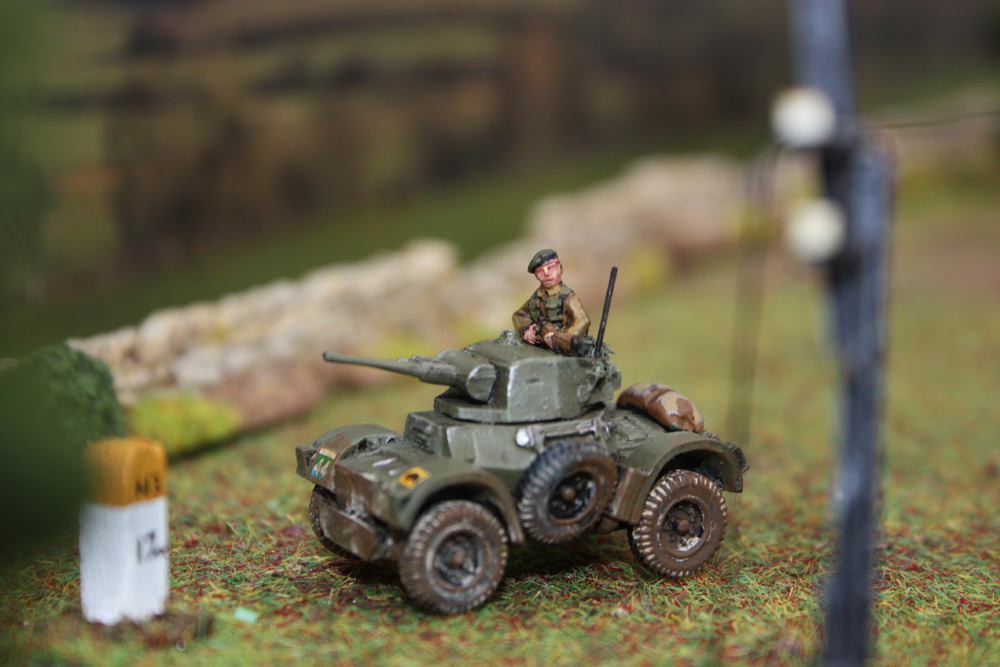
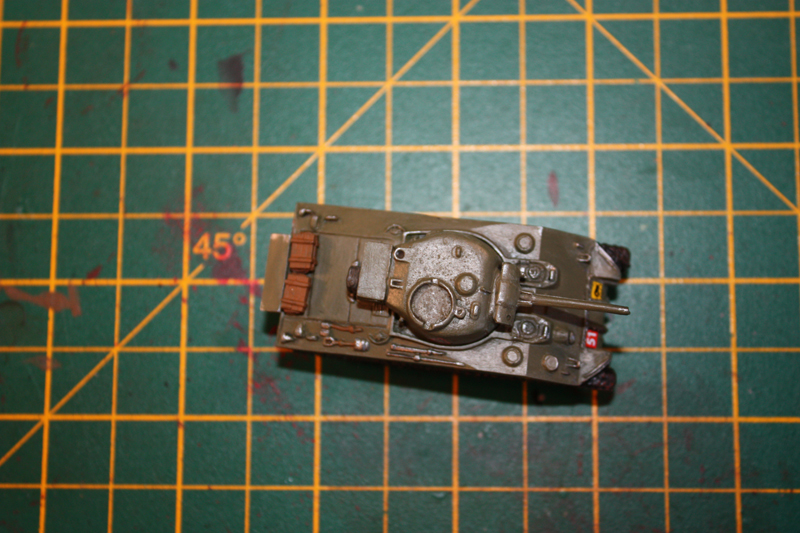
painters. The picture below is what the finished product looks like

with a nice backdrop behind it and in the correct lighting conditions.

I think my tutorial pictures had a bit too much light in them giving

the tank an incorrect shiny look.

Tut_30

Happy painting .

Been reading a lot recently and I thought I would

share my views on some of the content.

1st The Americans at Normandy by John C.Mcmanus

The-Americans-at-Normandy-by-John-McManus

One of the best books around and a very detailed account

of what the Americans did after they got off the beaches at

the Normandy landings. This book goes into great detail about

the lives of everyday soldiers and the problems they had to

overcome at great cost. Its still unbelievable after all the

planning that went into D-Day that not a thought was given

to the bocage countryside awaiting them, which would

prove a far greater obstacle than any beach defence and cost

a huge amount of lives. Compelling reading beginning to end.

2nd WWII Diorama Art by Roy Wells

5169555-f2c5f6771c355c500eb75618a511277f

This is the first book I have bought off Blurb and I was

extremely pleased with it. Its basically 1/35 scale models

set up in beautiful dioramas but we are talking serious,

serious high quality work. The book covers 20 detailed projects

with high quality glossy images of the superb work. You also get

an inside look towards the end on how the dioramas are built.

For me its something I just pick up now and again when I need

a bit of inspiration or want something to drool over.

3rd Painting Wargame tanks by Ruben Torregrosa & Mig Jimenez

painting-wargame-tanks1

For those of you that recognise the name, “Jimenez” you

probably know what your going to get and your right. Lots

of painting guides using Mig paints(Vallejo) and pigments.

Lots of glossy step by step guides on painting tanks ,including

an early Sherman, Stuart M5 and a Panther Ausf G, Panzer IV,

Panzer III, SDKFZ 251, T34 and Tiger. The book is also split

up into a beginners section and advanced painter.

All in all a good buy with lots of mouth watering pictures.

4th Painting war WWII German Army by Heresybrush

Blog01

I found this book on http://www.breakingwar.com and also on

http://www.heresybrush.com and its a lovely painting guide on

WWII German soldiers. What makes it really specially is that

includes step by step guides on different size models so

even 15mm is catered for. Once again the guide is Vallejo

paint only but this seems to be the norm in most military

painting these days. This is a very detailed guide and on

looking at the contents covers just about every German uniform

going and more. A must for any miniature German soldier painter.

……………………………………………………….

I hope you liked my reading material and the very quick reviews. All

four were good value for money and are very well presented books.

More soon….

Below is a final tally of what I got finished in 2014

to the best of my knowledge. There are quiet a few things

I have left off because they are too small to mention and

I`m sure somebody will remember something else that I have

just plain forgotten about. Lots of things just don’t make it

onto my blog, especially refurbs and smaller projects.

At 1st glance it looks a lot but just remember all the 28mm

stuff and 15mm will each fit onto a single 2×2 board apart

from the larger bits of terrain.

28mm

  • 4 x Blood Angels Command team
  • 1 x Space Hulk Cat
  • 1 x Black Legion rhino
  • 3 x Blood Angel vehicle crew
  • 5 x Blood Angel scouts
  • 5 x Death Wing Terminators
  • 1 x Large Ork Fort
  • 5 x Blood Angel Terminators
  • 24 x Black Legion Choas space marines
  • 5 x Orks
  • 1 Kromlech Ork cannon
  • 3 x Salamander rhinos
  • 1 x Salamnder Landraider
  • 1 Gothic Church battle board(2 x 2 feet)
  • 10 x Orks
  • 5 x Ork Glyphs
  • 1 X Khorne Berserker
  • 1 x Blood Angel Space Marine
  • 1 x Death Wing Terminator old style
  • 1 x Ork Nob
  • 1 x Ork Copter
  • 9 x Gretchin
  • 5 Ork Nobs
  • 12 x Iron Warriors Chaos Space Marines
  • 1 Iron Warriors Rhino
  • 1 Iron Warriors Warsmith
  • 12 x Imperial Guard & 1 Mortar team
  • 12 x Orks
  • 1 x 40k Statue
  • 2 x Imperial Guard Heavy Weapon teams
  • 2 x Iron Warrios Chaos space marines.
  • 1 x Iron Warriors Terminator
  • 1 x Chaos stone bit of terrain

15mm

  • 5 x Panther tanks
  • 3 x Firefly tanks
  • 10 x T26 tanks
  • 1 Horse drawn ambulance
  • 5 x explosion markers
  • 2 x BT5 tanks
  • 1 x Battle board(2 x 2 feet)
  • 1 x Jagdpanther
  • 1 x SU76
  • 1 x Fuel dump
  • 1 x Command bunker
  • 1 x ISU 2 tank
  • 1 X ISU 152 TD
  • 5 x wooden bunkers
  • 1 X Opel Blitz truck
  • 5 x Sherman tanks
  • 4 x Battle Boards(2 x 2 feet)
  • 5 x Cromwell tanks
  • Loads of bocage sections for battle board
  • 37 x British infantry
  • 2 x Sexton guns
  • 3 x Bren Carriers
  • 6 x Universal Carriers
  • 3 x 6pdr guns and crews
  • 1 x Matador truck
  • 8 x British MG teams
  • 13 x British Infantry
  • 1 X Normandy Farm complex
  • 4 x M10 tank Destroyers
  • 1 M18 TD
  • 1 Orchard terrain piece
  • Normandy signs and telegraph poles
  • 2 x Sexton guns
  • 1 x Normandy bridge terrain
  • 3 x Daimler Dingo scout cars
  • 1 x Staghound Scout car
  • 2 X Daimler armoured cars

My plan for 2015 is as follows but I`m bound

to deviate.

1. Lots more tutorials(step by step guides).
2. Lots more terrain.
3. Space Hulk stuff.
4. Infinity.
5. More book reviews.
6. Battle reports.
7. Reports from Wargames shows and museums.
8. Getting to grips with an airbrush.
9. Don’t paint as much stuff as 2014 and concentrate
on the detail and technique.

Finally I have left the piccies until last and

wish to thank everybody who has viewed or commented

on my blog.

IMG_5589

IMG_5602

dw10

ork7

IMG_5908

IMG_5902

IMG_5910

IMG_6090a

IMG_5924

IMG_6084a

IMG_6108a

IMG_6394a

IMG_6457a

IMG_6795a

IMG_6799a

IMG_6807a

B9

IMG_5463

IMG_5641

IMG_5646

IMG_5658

IMG_5665

Untitled-1

IMG_5938

IMG_6172a

IMG_6241a

IMG_6349a

Untitled-10

Untitled-3

IMG_7128a

IMG_7136a

Untitled-12

IMG_7803a

IMG_7729a

IMG_8084x

IMG_8064x

Everything3-1

Untitledxx-1

I seem to have slowed down as Christmas is crept up

and concentrated on the small bits of detail needed to

bring the battlefield to life.

More walls(you can never have enough walls), a water trough

and pump by Hovels, a well from Hovels, a barn from a cannot

honestly remember(I buy things and they sit in boxes for ages

and then I remember them but for the love of.. I cant think

where I bought them from !) and some crafty animal water troughs/

feeders which have come from a new spring of battlefield goodies

I discovered recently. The spring of goodies is the world of miniature

dolls houses and farm equipment and its huge and full of 15mm/20mm size

objects 🙂

Anyway I bought a couple of cow looking troughs and stuck them to

side of the building and a wall and filled them with Scenic realistic

water(I tried E-Z water 1st but was not happy with the result). Add on

some foliage and Bobs your uncle. I also scratch built a tap on the side

of the barn to feed the trough.

None of its actually finished yet but nearly there.

IMG_8107

IMG_8111

IMG_8113

IMG_8119

Finally just got to say to everybody, “Have a wonderful

Christams and I hope Santa brings everything you want“. Failing

that do what I do every year,put your own presents under the

tree lol

menu-logo

Its just been released today specifically for people playing Flames Of War.
Basically its an online army generator saving you the time and effort to
work out what you can and cannot field on the table.

Here is the official line :

Forces Of War gives you the ability to prepare and refine army lists effortlessly.
This website is an automated tool which lets you trial endless combinations of platoons
and options from Flames Of War Intelligence Briefings until you find the ideal design
for any points level or model collection. Not only does it allow you to build the perfect army list,
but also print it out in an attractive, easy-to-read format, including the appropriate
Arsenal data and Special Rules for your force
.

Beware there is a cost involved but its a lot cheaper than buying all the books.
Rough costs work out at $16 an online briefing compared to a $50 book.
You can also have smaller briefings at a $1 a go. Its also only in ipad format so far, I think ?

Follow the link below : http://forces.flamesofwar.com/index.aspx

A big plus for this as I see it is that its much easier to have a tablet on your
gaming board with all the rules, lists and info than half a dozen large books.
The storage factor is also a large plus as I have shelves of books going dusty.

I will be giving it a go later and will report back.

As the end of the Year is just round the corner I

decided to go for a group shot of my growing British

forces which are being assembled to take on my Panzer

Lehr sledgehammer.

Just click on a picture to enlarge. Be aware these

pictures are quite big 🙂

Everything1-1

Everything2-1

Everything3-1

Plenty more room on the table so best get painting.

I think some aerial power is required ?

Everybody needs something to stop the Panzers in

their tracks and these babies could do just that.

17pdr guns that had better performance than the

German 75-mm (long) or 88-mm counterparts.

All four are made by Battlefront and I have chopped

and changed the crews to make them as British looking

as possible. Out with helmets and in with the berets and

pipes. The vehicles have 75th Anti-Tank Regiment markings

which once gain fits nicely into the 11th Armoured Division

tree.

Click on an image to enlarge 🙂

IMG_8053x

IMG_8058x

IMG_8062x

IMG_8064x

IMG_8070x

IMG_8074x

Continuing with my British forces I decided to add

some much needed recon starting with an Armoured

Car Platoon. I have started with 3 Daimler Dingos

by Battlefront,2 Daimler Mk1 Armoured Cars by

Battlefront and a beefy Staghound by Skytrex. I

already have a Carrier Platoon so I can mix and

match as required in the reconnaissance role.

All the vehicles and markings still fit into the

11th Armoured umbrella with the “44” being the

Inns Of Court Regiment

I have added some extra stowage and changed a

few of the crew. I also added aerials which are

essential for a recon vehicle to report back what

it can see.

Click on any image to enlarge 🙂

IMG_8083x

IMG_8084x

IMG_8081x

IMG_8088x

IMG_8089x

IMG_8075x

IMG_8078x

Untitledx-2

Untitledxx-1

Sorry if you thought I was done but I needed

another two boards. Specifically I wanted a

river/stream, a bridge, trenches and just a bit

more bocage.

To save time I borrowed two old flat terrain

boards from the shed and started converting

them. I have made and painted the bridge and

found a pillbox going spare which will look

right at home hidden in undergrowth.

Click on a picture to enlarge :

IMG_7935a

The two boards look a bit rough but bare with

me because as mentioned they have been re-used.

The first board sits on the left and contains the

trench system I am currently building out of balsa

wood. Its raised ground so will be able to cover

and arty spot all six boards eventually. It will

also be buried under bocage and have a stream

running above it as marked by the stick.

IMG_7939a

The trench will go under ground at the right hand

side of the board and reappear on the next board.

This way the join marks are nicely concealed 🙂

The board on the right has two artillery emplacements

either side of a road with the stream running in front

of it with a bridge.

The trench system comes in from the left side.

Boardaa-1

Sorry if the pictures are hard to understand,

but all will become clearer shortly.

The hidden enemy

Posted: November 12, 2014 in 15mm, Uncategorized
Tags:

I do most of my terrain building in my trusty shed

and this morning on entering I came across a scene

of utter disaster. A rodent of some type had eaten

through three(yes un-freaking believable) 5 ltr plastic

oil holders. One 5ltr bottle of chainsaw lubrication of

a blue colour on a high shelf allowing to drip onto a worktop

and lots of power tools. One 5ltr bottle of red coolant that

then leaked through a wood pile,soaked into an mdf shelf

and caused it to bend and collapse. Also one 5ltr container

of 2 stroke engine oil which leaked into a tool chest.

Anyway after a couple of hours cleaning and cursing

I have prepared the shed and its looks like a scene from

predator where Arnie is waiting for it to get him 🙂

But just in case my prey is not quiet that big I have given

Hauptmann Tom a special mission . Operation Watch on the

mdf worktop.

IMG_7891

Jerry watching Jerry ? 🙂